Wednesday, October 23, 2013

Spanning Tree Exercise and Revisiting Root Guard

This was actually spurned from a comment I received on another one of my blog posts that you can find here.  Seeing that comment, I white boarded it and realized that I may have been completely wrong in regards to how Root Guard could “break a network”. 

Let’s say we have the following topology:

image

  • Core 1 is the root for VLAN 10 with a configured priority of 4096, and is the secondary root for VLAN 20 with a configured priority of 8192.  We alternate this with Core 2 in order to load balance VLAN traffic.
  • Access 3 and 4 are left in default configuration regarding spanning tree.
  • Two workstations are present – one in VLAN 10, and another in VLAN 20.  Their default gateways are SVIs that are on the Core switches.
  • For simplicity, switch MAC addresses are the number contained in their names.  Example: Access 4’s MAC address is “4”.
  • All link costs are the same.
  • All links between switches are trunks transporting all VLANs.

Let’s work through the spanning tree topologies.

Core 1 – Root bridge for VLAN 10.  All ports designated.

Core 2 – Port 1 will be a root port due to lowest cost to root. Since the cost to reach root for Core 2, Access 3, and Access 4 are equal, and a root port exists, ports 2 and 3 will be designated due to Core 2 having the lowest bridge ID (STP tie-breaker)We know this by calculating the bridge IDs:

  • Core 2  - MAC Address (2) + VLAN ID (10) + Priority (8192) = 8204
  • Access 3 – MAC Address (3) + VLAN ID (10) + Priority (32768) = 32781
  • Access 4 – You get the idea.

Access 3 and 4 – Port 1 will be the root port leaving port 2 as blocking since there are already designated ports on those links belonging to Core 2.

VLAN 10 Port 1 Port 2 Port 3
Core 1 Designated Designated Designated
Core 2 Root Designated Designated
Access 3 Root Blocking N/A
Access 4 Root Blocking N/A

And for VLAN 20:

VLAN 20 Port 1 Port 2 Port 3
Core 1 Root Designated Designated
Core 2 Designated Designated Designated
Access 3 Blocking Root N/A
Access 4 Blocking Root N/A

Now we can see how traffic will flow from each workstation to each other.

VLAN 10 Workstation to VLAN 20 Workstation:

  1. Traffic leaves VLAN 10 Workstation and hits VLAN 10 SVI on Core 1
  2. Multilayer switched to VLAN 20 within Core 1.
  3. Hit Core 2 since the link directly to Access 4 is blocked on VLAN 20.
  4. Traverse Access 4 to reach VLAN 20 Workstation.

image

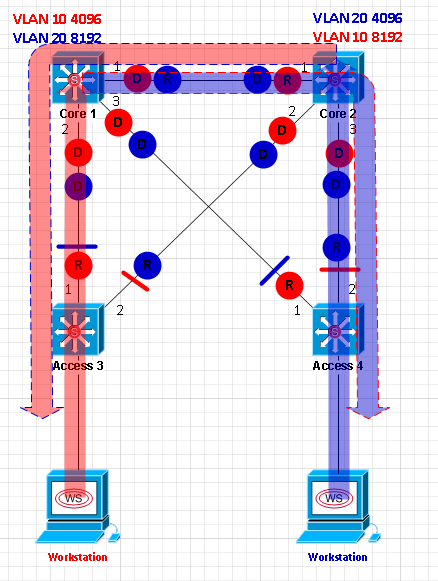
And now we move to the million dollar question from my previous blog article.  Let’s say we have Root Guard configured on ports 2 and 3 on both Core 1 and Core 2.  What happens when we lose the link between the Core switches? First it may warrant to discuss what happens without Root Guard in place:

Core 1 – Root bridge for VLAN 10 – all remaining ports remain designated.

Core 2 – Since the cost to root is the same going through either Access 3 or Access 4, port 2 will transition to a root port due to, again, Access 3 having the lowest bridge ID. Port 3 will transition to a blocking state since Access 4 now has the lowest cost to reach root for that link.

Access 3 – Port 1 remains a root port.  Port 2 transitions to a designated port since Access 3 has the lowest cost to reach root on that link.

Access 4 – Port 1 remains a root port.  Port 2 transitions to a designated port since Access 4 has the lowest cost to reach root on that link.

VLAN 10 Port 1 Port 2 Port 3
Core 1 Down Designated Designated
Core 2 Down Root Blocking
Access 3 Root Designated N/A
Access 4 Root Designated N/A

And for VLAN 20:

VLAN 20 Port 1 Port 2 Port 3
Core 1 Down Root Blocking
Core 2 Down Designated Designated
Access 3 Designated Root N/A
Access 4 Designated Root N/A

This has some pretty drastic results:

image

The path for the blue Workstation to the red Workstation is pretty straight-forward.  But check out the path from the red Workstation to the blue one:

  1. Traffic from the VLAN 10 Workstation hits the VLAN 10 SVI on Core 1 as usual.
  2. Multilayer switched to VLAN 20 within Core 1, again, as usual.
  3. Here’s where it gets interesting.  The link between Core 1 and Core 2 is physically down, and STP is blocking on port 3 for VLAN 20, so this traffic must go back down to Access 3.
  4. Traffic traverses Core 2 and Access 4 before finally reaching its destination.

Now let’s see what happens when we enable Root Guard on Core 1 and Core 2’s ports 2 and 3:

image

  • Core 1 begins receiving superior BPDUs on VLAN 20 on ports 2 and 3, so it places those ports in root-inconsistent.
  • Core 2 begins receiving superior BPDUs on VLAN 10 on ports 2 and 3, so it places those ports in root-inconsistent.
VLAN 10 Port 1 Port 2 Port 3
Core 1 Down Designated Designated
Core 2 Down Root-Inconsistent Root-Inconsistent
Access 3 Root Designated N/A
Access 4 Root Designated N/A


VLAN 20 Port 1 Port 2 Port 3
Core 1 Down Root-Inconsistent Root-Inconsistent
Core 2 Down Designated Designated
Access 3 Designated Root N/A
Access 4 Designated Root N/A

Now lets take a look at traffic flow from the red Workstation to the blue:

  1. Traffic leaves the VLAN 10 Workstation and hits the VLAN 10 SVI on Core 1
  2. Multilayer switched to VLAN 20 within Core 1
  3. Uh oh – port 1 is physically down and ports 2 and 3 are down for VLAN 20 thanks to Root Guard.  The traffic has no where to go!

Welp – guess I wasn’t wrong after all.  This appears to be a corner case scenario because if it were only a single instance of spanning tree there would be no issue.  Even in this scenario, intra-VLAN communication would be fine, but this does break inter-VLAN communication.

Thursday, October 3, 2013

OSPF Adjacency Building Process

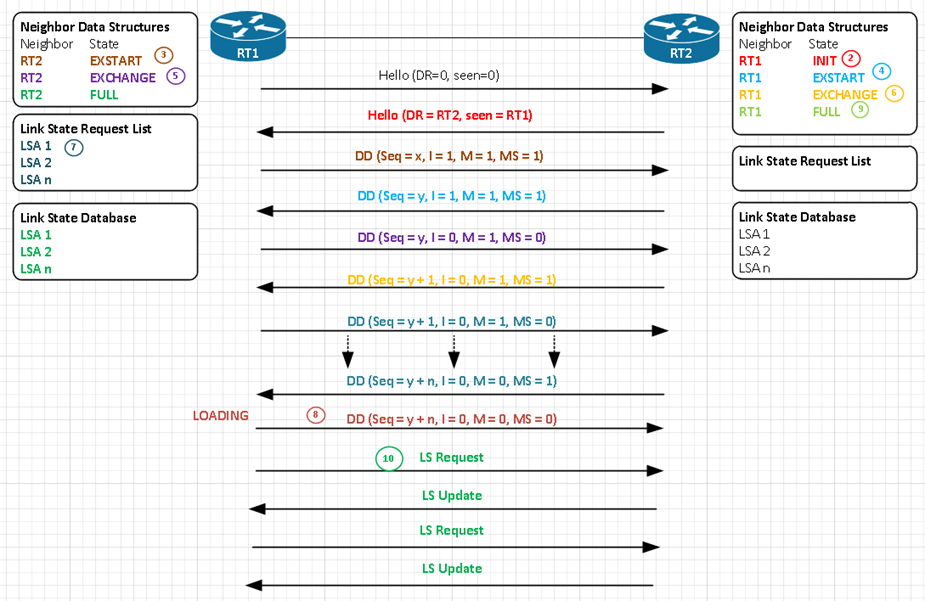
Ever curious regarding how two routers configured for OSPF become fully adjacent?  The following diagram of the process was modeled directly from RFC 2328, and the steps described gleaned from the Routing TCP/IP Vol I book.  Since we can see mention of a DR, this example must be based on a multi-access network.

image

  1. RT1 becomes active and sends a Hello.  At this point, RT1 hasn’t seen any neighbors, so it reports such and sets its DR and BDR fields to 0.0.0.0.
  2. Upon receipt by RT2, RT2 will build a data structure for RT1 and set RT1’s state to Init.  RT2 will then send a Hello packet reporting that it has seen RT1, and will report itself as the DR.
  3. RT1 now sees its own RID in the received Hello packet from RT2, so RT1 will now create a data structure for RT2 and set its state to ExStart.  RT1 then begins Master/Slave negotiation with a DD packet with a sequence number of “x”, the Init bit set  to indicate that it is the start of an exchange, the More bit set to indicate that it is not the last DD packet to be sent, and lastly with the MS-bit set to indicate that RT1 wants to be the Master.  No LSA summaries are provided just yet – this is purely for Master/Slave negotiation.
  4. Upon receipt of RT1’s DD packet, RT2 sets RT1’s state to ExStart.  RT2 then sends a DD with a sequence number of “y”, and the MS-bit set since RT2 has a higher RID in this example.
  5. RT1 agrees that RT2 is the Master and sets its state to Exchange. RT1 informs RT2 of its agreement by sending a DD packet with a sequence number “y” that matches what was sent from RT2 in step 4.  The MS-bit will now be set to 0, and here is where we’ll start to see LSA summaries provided by RT1.
  6. RT2 now sets RT1’s state to Exchange as well and sends a DD packet containing LSA headers from its Link State Summary list and increments the DD sequence number to “y+1”.
  7. RT1 acknowledges this by sending an acknowledgement with the same sequence number that it received in the DD packet from RT2.  It also begins taking the LSA summaries it received and building a Link State Request list.  This process repeats until RT2 sends the last of its LSA summaries and sets the More bit to 0.
  8. Once RT1 receives the last of RT2s LSA summaries and acknowledges it knowing that it has sent the last of its own LSA summaries, the Exchange state process is complete.  Now RT1 will begin processing the LSA summaries it has added to its Link State Request list and transition to the Loading state.
  9. Once RT2 receives RT1’s last DD packet, RT2 then sets RT1s’s state to Full because RT2 has no entries in its own Link State Request list.
  10. RT1 will send Link State Requests for all entries in its Link State Request list and RT2 will send Link Sate Update packets until RT1’s list is empty.  At that point, it sets RT2 to Full, and the adjacency is complete.

Tuesday, October 1, 2013

OSPF Link State Advertisements (LSAs) and Areas – Part II

For a table describing the different LSA types, check out the first post of this series.

In the first part of the series, we looked at LSA Types 1, 2, and 3 – Router, Network, and Network Summary, respectively.  To move on to the next two LSA types, we need to bring in another Autonomous System (AS).  In the diagram below, we’ve added R5 which has an interface in EIGRP AS 1, and is redistributing that into OSPF Area 4.  The fact that R5 has an interface inside of the OSPF AS, as well as the EIGRP AS, makes R5 an Autonomous System Boundary Router (ASBR). 

image

The EIGRP-oriented subnet that is being redistributed is considered an external route to the OSPF domain, so a Type 5 LSA, or ASBR External, is flooded into OSPF Area 4 containing a LSID and netmask of the subnet, plus the External Type. This important because it tells other routers whether or not to add the internal link costs within the OSPF domain to the metric to reach that subnet.  A type 2 external route specifies that only the external cost is taken into consideration.

image

When R2 catches wind of this, it will generate a Type 4 LSA, or ASBR Summary, and flood it into Area 0 as well as the Type 5 LSA.  The contents of the Type 4 LSA are mostly just the LSID of the ASBR’s RID and the metric reach it.

image

For  other routers to reach this External Type 2 route, they just take metric provided in the Type 5 LSA (20) – no questions asked.

image

However if it were an External Type 1 route, each router must determine its cost to reach it taking into account the link costs along the way.

So in this example, if R1 needed to reach 172.16.5.0/24 as an External Type 1 route, it would first add the cost to reach R2 (The ABR) [Similar to what it would do to determine cost to an intra-area (IA) route utilizing a Type 3 LSA] to the cost to reach the ASBR as listed in the Type 4 LSA.  Finally, it would then add the cost listed in the Type 5 LSA for that subnet.

Cost to reach ABR (1) + Cost to reach ASBR (2) + Cost in Type 5 LSA (20) = 23

image

Stubby.. Totally Stubby… Not-So-Stubby… Totally Not-So-Stubby….

While there are several iterations of a stubby area, with varying mechanics behind them, they all serve mostly a single purpose – to reduce overhead.

image  

Once R6 is added and area 6 is configured as a stubby area, two major things happen:

  • R3 (An ABR for area 6) will still receive, but stop flooding Type 5 LSAs into area 6.  Notice that R6’s routing table does not include R5’s EIGRP-oriented subnet (172.16.5.0/24)
  • R3 injects a default route into area 6

image

So we can see here that the logic is, hey, there’s only going to be one way to get out of this area, so let’s reduce the size of the LSDB and make things easier by just injecting a default route into the area and calling it a day.  Imagine if R5 had 100 subnets hanging off of it in the EIGRP AS – if R6 wasn’t in a stubby area, those 100 routes would be added to its LSDB and in the routing table.  Why do that if we can just inject a default route and not advertise these external routes into the area – effectively accomplishing the same thing?  If R6 needs to hit any of these external routes, it just uses the default route to the ABR who knows how to get there, and greatly reduce the size of R6’s LSDB and routing table all at the same time!

image

A “totally” stubby area takes this concept even further by also not flooding Type 3 LSAs.  What’s kind of interesting about that statement though is that the default route R3 injects into the stubby area is a Type 3 LSA.

image

A Not-So-Stubby Area (NSSA) simply allows you to redistribute external routes if needed.  A special type of LSA is used in this situation – a Type 7, or NSSA External.

image

This will be generated by the now ASBR, R6, who is redistributing its connected 192.168.6.0/24 subnet.  As depicted above, once it reaches the ABR, R3, it will convert this LSA into a Type 5 before flooding it into area 0, so you will only see Type 7 LSAs in a NSSA.

image  image

image  image